Rspberry PI Pico をポチってから micro-Python をかじり始め、簡単なプログラムを作成しながら習得に努めています。
今回は CircuitPython を Pico にインストールし ロータリーエンコーダーを使い、Windows用に 拡大縮小、左右のスクロール、ボリュームコントロール、スリープなどが出来るようにコントロールノブを作成します。
使用パーツ
主要パーツは Pico と ロータリーエンコーダーにRGB_LEDです。
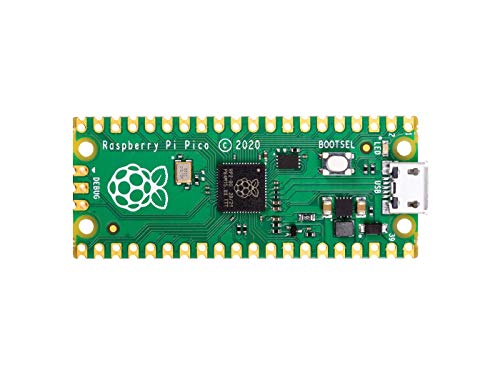
Raspberry PI Pico
ロータリーエンコーダー
RGB 発光ダイオード(5mm)
その他、1KΩ抵抗、配線用ワイヤー、LEDフォルダー、ユニバーサル基板など
回路図
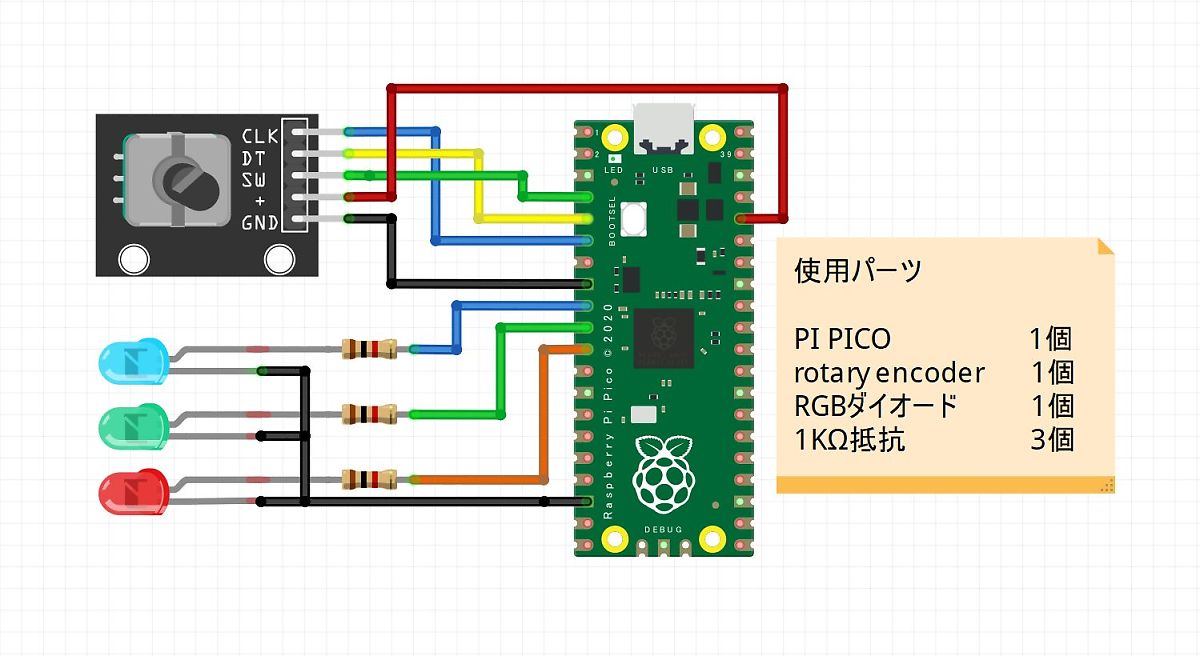
回路図はパーツが少ないので簡単ですが Fritzing で作成したので載せておきます、回路図上ではLEDが3個表示されていますがRGB_LED を使用していますので1個になります。
エンコーダーの電源は Pico の 3.3V から取ります、LEDの抵抗は1kΩを使用していますが適宜変更して下さい。

プログラム
プログラムは下記のYouTubeを参考にしています、ケースのSTLデータやプログラムへのリンクがあります。
準備
このプログラムは CircuitPython を使用しますので、Picoにインストールします、ダウンロード先はこちら。
次にlibraryをインストールします、下記よりZIPファイルをダウンロード解凍し、解凍した中にある adafruit_hid フォルダを Pico に作成した lib フォルダ内に入れます。
Windows10設定
Windows用の機能は、拡大縮小、ボリュームコントロール、水平スクロール、長押しでスリープ になります。
スリープ機能はWindows上で休止の無効化とショートカットの作成が必要になります、方法については分かりやすい参考サイトがありますので載せておきます。
作成したスリープのショートカットはディスクトップに置いておかないと動作しないようです。
休止の無効化
ショートカットの作成
Windows用に変更したプログラム
参考動画はMAC版なのでWindows用に変更し各モード表示用にLED部分 を追加しました、 色は 青・赤・緑 で登録した機能により点灯します 。
機能を変更して使用したい場合はここを参考に設定できます、また機能を多く登録するとかえって操作が面倒になります。
import digitalio
import board
import usb_hid
import time
from adafruit_hid.keyboard import Keyboard
from adafruit_hid.mouse import Mouse
from adafruit_hid.keycode import Keycode
from adafruit_hid.consumer_control import ConsumerControl
from adafruit_hid.consumer_control_code import ConsumerControlCode

print("== Pi Pico 多機能ノブ 1.0 ==")

led0 = board.GP6
led1 = board.GP7
led2 = board.GP8

led0 = digitalio.DigitalInOut(led0)
led1 = digitalio.DigitalInOut(led1)
led2 = digitalio.DigitalInOut(led2)

led0.direction = digitalio.Direction.OUTPUT
led1.direction = digitalio.Direction.OUTPUT
led2.direction = digitalio.Direction.OUTPUT

CLK_PIN = board.GP4
DT_PIN = board.GP3
SW_PIN = board.GP2
clk_last = None
count = 0
totalMode = 3
currentMode = 0

cc = ConsumerControl(usb_hid.devices)
mouse = Mouse(usb_hid.devices)
keyboard = Keyboard(usb_hid.devices)


clk = digitalio.DigitalInOut(CLK_PIN)
clk.direction = digitalio.Direction.INPUT

dt = digitalio.DigitalInOut(DT_PIN)
dt.direction = digitalio.Direction.INPUT

sw = digitalio.DigitalInOut(SW_PIN)
sw.direction = digitalio.Direction.INPUT
sw.pull = digitalio.Pull.UP

def led():
    if (currentMode == 0):
        led2.value = False
        led0.value = True

    elif (currentMode == 1):
         led0.value = False
         led1.value = True

    elif (currentMode == 2):
         led1.value = False
         led2.value = True

def millis():
    return time.monotonic() * 1000

def ccw():
    print("CCW")

    if (currentMode == 0): # 画面縮小
        keyboard.press(Keycode.CONTROL)
        mouse.move(wheel=-1)
        keyboard.release(Keycode.CONTROL)

    elif(currentMode == 1):   # ボリューム下げる
        cc.send(ConsumerControlCode.VOLUME_DECREMENT)

    elif(currentMode ==2):    # 水平スクロール右
        keyboard.press(Keycode.SHIFT)
        mouse.move(wheel=-1)
        keyboard.release(Keycode.SHIFT)

def cw():
    print("CW")

    if (currentMode == 0):     # 画面拡大
        keyboard.press(Keycode.CONTROL)
        mouse.move(wheel=1)
        keyboard.release(Keycode.CONTROL)

    elif(currentMode == 1):     # ボリューム上げる
        cc.send(ConsumerControlCode.VOLUME_INCREMENT)

    elif(currentMode ==2):     # 水平スクロール左
        keyboard.press(Keycode.SHIFT)
        mouse.move(wheel=1)
        keyboard.release(Keycode.SHIFT)

def long_press():
    #スリープ: Ctrl+Shift+Alt+End
    keyboard.press(Keycode.CONTROL, Keycode.SHIFT,Keycode.ALT,Keycode.END)
    keyboard.release_all()

while(1):
    led()
    clkState = clk.value
    if(clk_last !=  clkState):
        if(dt.value != clkState):
            cw()
        else:
            ccw()

    if (sw.value == 0):
        pressTime = millis()
        time.sleep(0.2)
        longPress = False

        while(sw.value == 0):
            if(millis() - pressTime > 1000 and not longPress):
                print("longPress")
                longPress = True
                long_press()

        if (not longPress):
            currentMode += 1
            currentMode %= totalMode
            print("Mode: " + str(currentMode))

    clk_last = clkState
ケース作成と組み込み
ケースは参考動画の物が使用できますが、LED を追加したため新しく作成しました 、大きさは幅60mm×高さ40mmです。


